hiker fuel

Sweet Breakfast Rice - Trail Recipe

Breakfast recipes on the trail can be hit or miss for some people.  While some hikers prefer to walk and eat, others prefer waking up with a full breakfast to keep them going in the morning.  Before I became a distance hiker I wasn't much of a breakfast eater.  After I got into my trail routine, however, I quickly realized that if I wanted to have any kind of energy before noon I needed to eat a few times in the morning.  In 2015, when we were setting out to do our thru hikes around the east coast, it was very clear that I'd need to make breakfasts for myself as NoKey definitely falls into the "walk and eat" category of backpackers.  I found myself focusing on flavors I loved and that's where this recipe came from.  

Back in the day, well, back in 2008 when I first started backpacking, there was a brand of commercial foods called Enertia.  They had an amazing breakfast I loved called Cherokee Rice Pudding and it was a sweet breakfast you could eat hot or cold.  I knew when I was setting out to create breakfasts for myself that Cherokee Rice Pudding would need to be recreated.  Sadly, Enertia was bought by Coleman several years ago and the food brand was phased out.  Since I couldn't find the ingredients online I recreated my own special version of Sweet Breakfast Rice. 

Sweet Breakfast Rice (2 servings)

1/2 home dehydrated basmati rice, cooked in vanilla almond milk before drying
1/4 cup dried tropical fruit of your choice (I love to mix it up!)
2 tbsp slivered almonds
1/2 tsp sugar
1/4 tsp cinnamon

At home, mix all ingredients together in a small mixing bowl making sure to evenly distribute all flavors.  Split in half amongst two zipper bags and seal. 

On Trail: Add ingredients to your cook pot and bring to a boil.  Let sit until cool enough to eat or until you reach desired texture.  

Trail Mac 'N Cheese - Trail Recipe

There are fewer meals hikers love more than Mac 'N Cheese.  When I was thru hiking on the AT, Mac N Cheese night more often than not meant a box of the cheapest stuff at the store without any milk or butter to make it more delicious.  Then, you’d wipe the pot clean with whatever kind of bread you had to clean it up.  Mac 'N Cheese is a fun comfort food, but when you’re making your own meals with nutritional factors in mind a box of the cheapie stuff just won’t do.  Here’s my recipe for Trail Mac that will definitely leave you wanting more!

Trail Mac - 1 serving

1/2 cup macaroni of your choice (does not need to be precooked!)
1/4 cup dehydrated veggies
1/2 tsp dried onion flake
1 tbsp + 1 tsp cheese powder
1 tbsp full fat powdered milk
1/4 tsp dried parsley
1/8 tsp garlic powder
1/8 tsp cayenne pepper
1/8 tsp paprika
1/8 tsp red pepper flake

At home: Add the macaroni, dehydrated veggies, and onion flake into a sandwich size zip top bag.  Add the cheese powder, milk powder, and spices to a smaller snack size zip top bag and mix to combine.  Seal the smaller bag, add to the larger bag, and seal.  

On trail: Add macaroni to your pot and cover with water (just to the tops of the pasta).  Bring to a boil, stirring every few minutes to avoid sticking.  Cook pasta to desired level of doneness and stir in the contents of your spice/cheese packet.  Let meal sit, stirring occasionally, until the sauce thickens.  

Dehydrator 101

After my big thru hiking announcement last week I've decided to share some of my favorite backpacking recipes with you guys; however, it occurred to me that while I'm whipping up a lot of these recipes like it's no big deal you might not feel that way too!  In fact, it took me a while to perfect my methods for dehydrating tasty meals.  Once you finally start to master techniques to make your food taste better, dehydrating your own backpacking meals is an easy "set it and forget it" option that not only can provide you better nutrition, but can also save you money on resupplies in tough areas.  Here's my quick and dirty guide to dehydrators - both purchasing and techniques to help you make your best backpacking meals.  

The Purchase

Buying a dehydrator is going to be an investment.  In fact, I'd look at it the way you look at purchasing a major kitchen appliance.  After doing plenty of research about what I'd like to use to make an entire season's worth of hiking meals I chose a 5-Tray Excalibur system with a thermostat.  The thing about dehydrating backpacking meals is that you aren't throwing them all in at one time.  First, you're dehydrating the mixed vegetables for a few days. Then maybe you're doing rice for a few days.  Then, you might be doing a few batches of sweet-flavored rice. You do everything in parts before assembling the meals.  Having a fan and a thermostat will help ensure you're dehydrating fruits and veggies at optimal temperatures to keep nasty bacteria at bay.  Meat, fruit, veggies - they all have optimal temps for pulling out moisture.  The thermostat will definitely make sure you're drying your food at the safest temperatures.  

While there are cheaper countertop models of dehydrators available, I definitely recommend going with a model with a fan for air circulation.  The round tray systems need constant babysitting to move the trays.  If you don't do this in a fan-less model, you'll have leather-like layers closer to the heat source whereas your top layers might not even be halfway dry.  You can definitely do months' worth of food on one of these budget models, but be sure you have the time to dedicate to rearranging the trays.  

Finally, you'll need a set of fruit leather trays for your dehydrator.  You can again go the budget option and use parchment paper.  I went with the generic fruit leather reusable inserts on Amazon.  I've reused them countless times for the past three years and they don't hold flavors and just need a quick rinse.  I highly recommend them.  Aren't planning on making fruit roll-ups?  That's fine - neither did I!  But, you'll need these guys to dry sauces, veggie paste, even condiments you'll want to dry to make them more potent.  Trust me, you WANT these tray inserts!

Techniques

So you've purchased your dehydrator and you've found a couple of recipes you want to try out.  Maybe you want to try and recreate one of your favorite pasta sides at a fraction of the price you'd pay for them over the period of a distance hike.  Either way, it's time to start dehydrating.

Rice

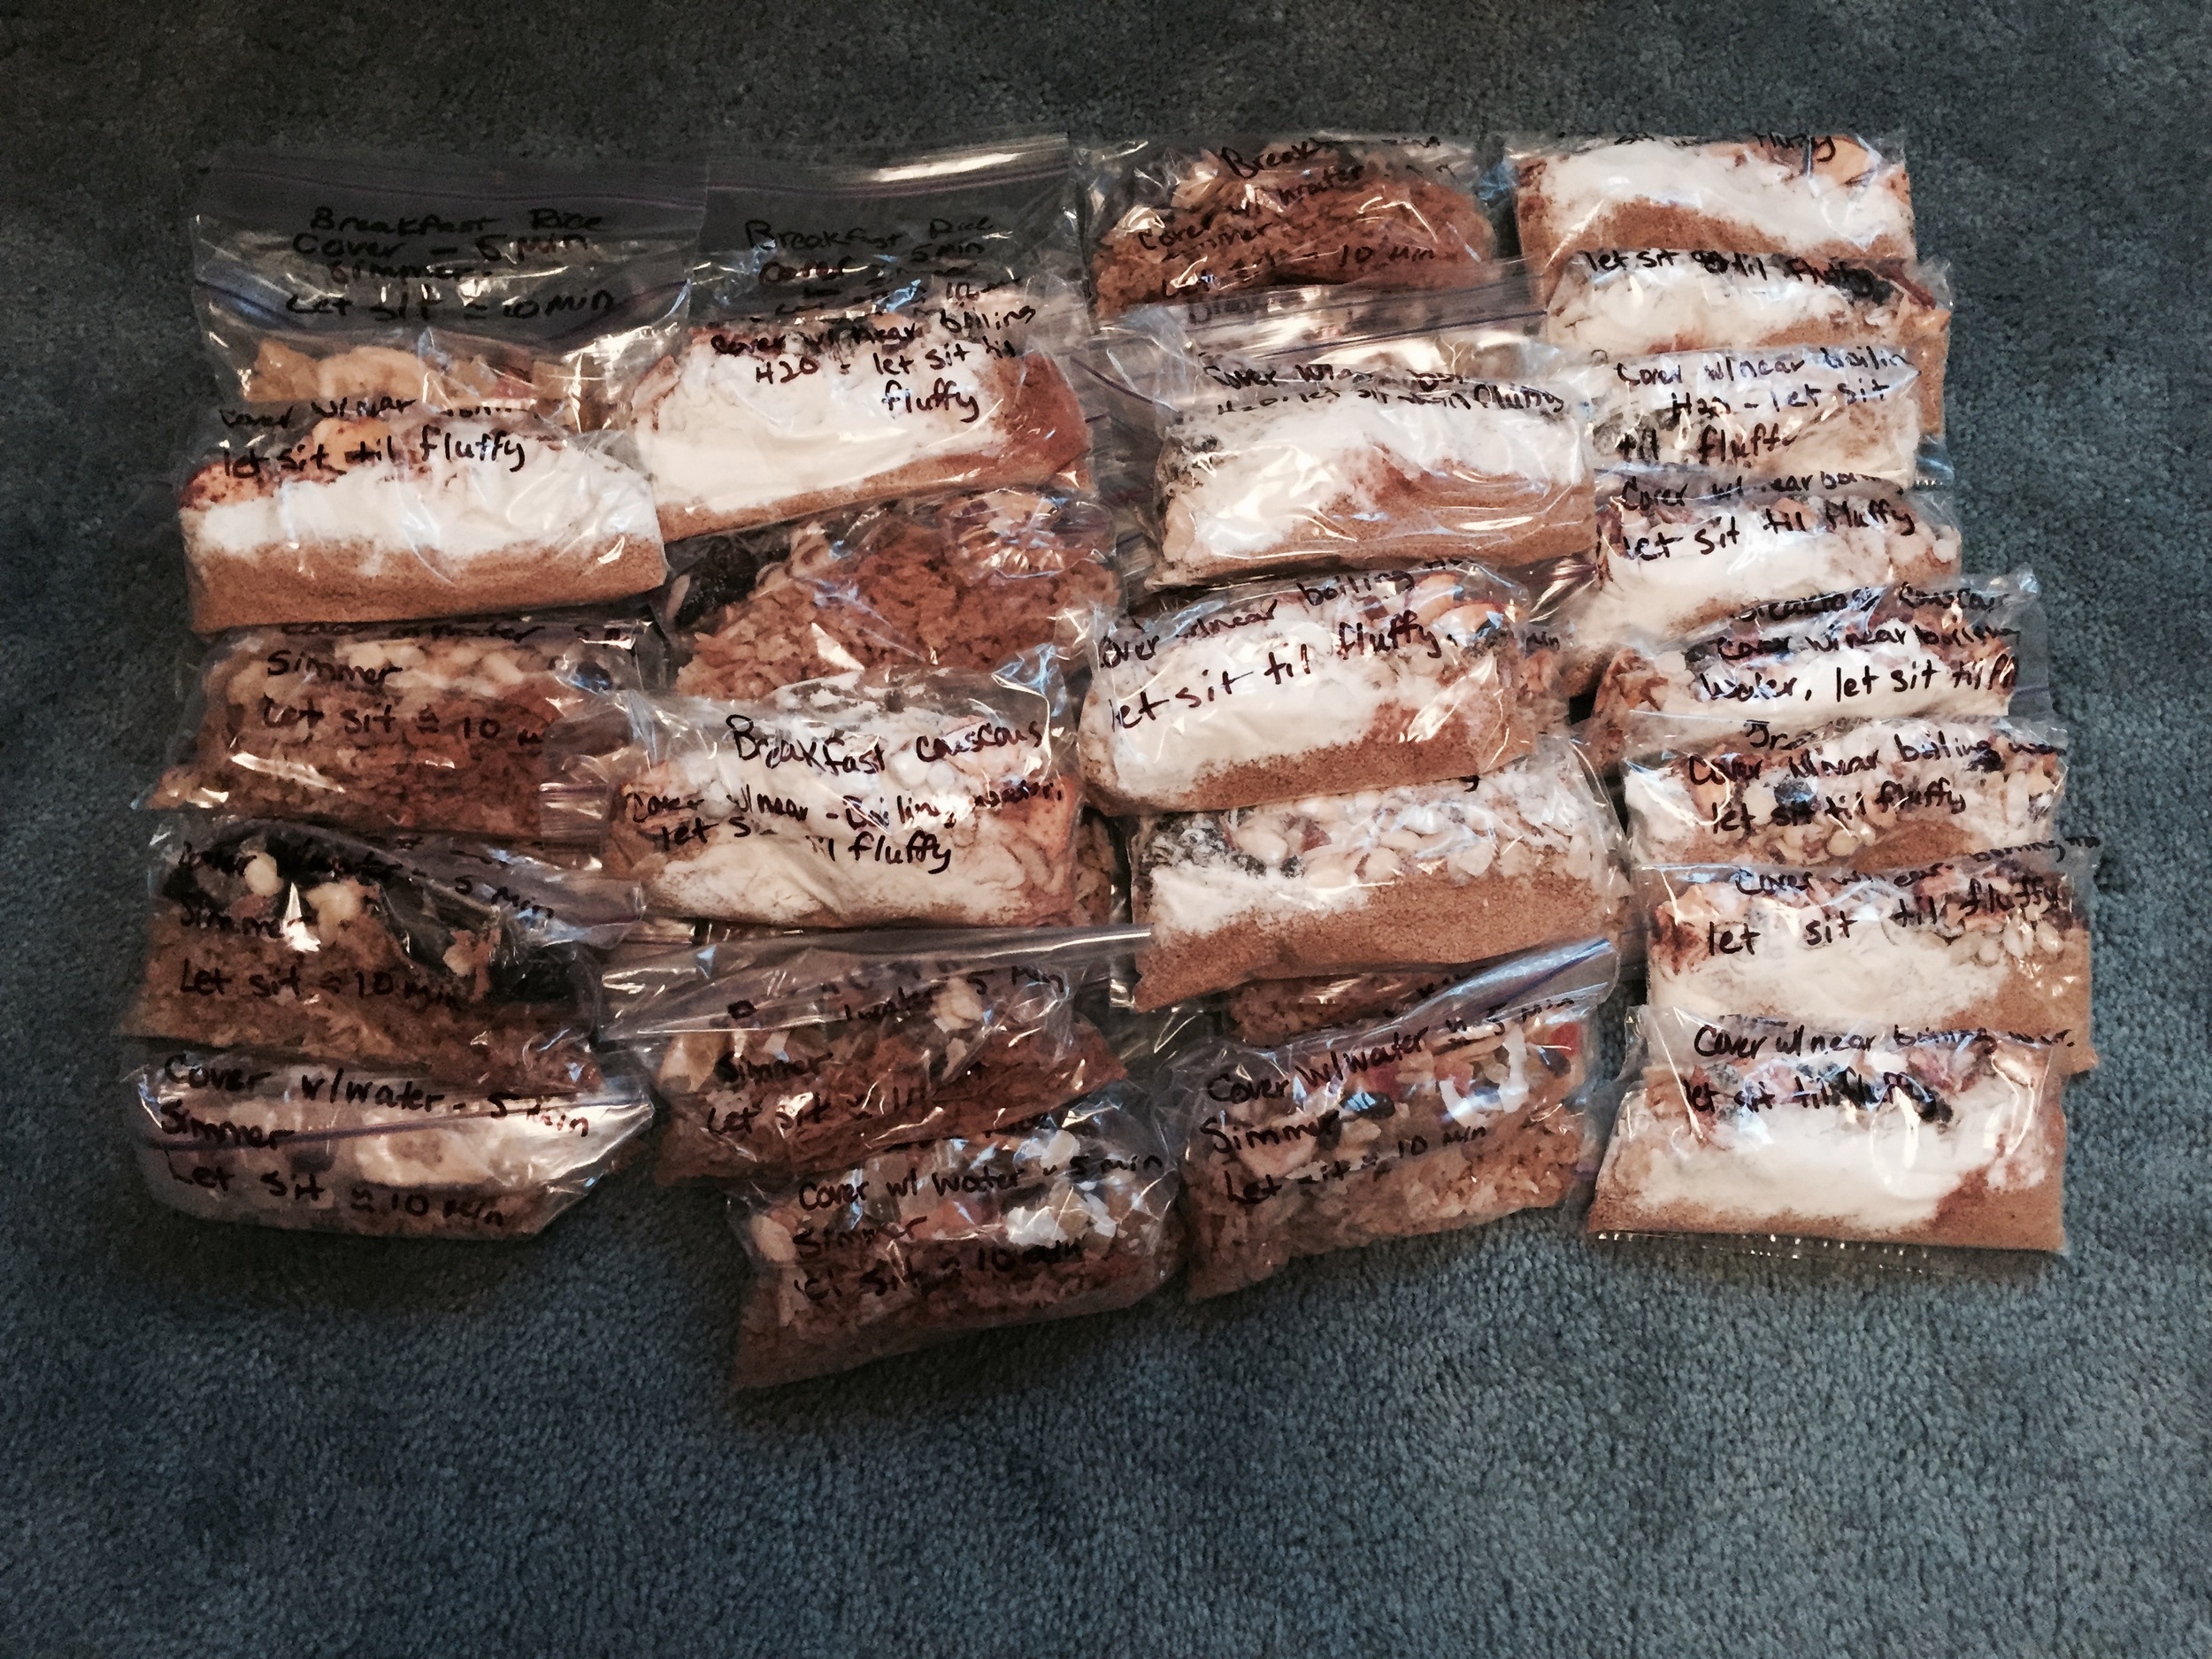
Let's say your recipe calls for you to use your own dehydrated rice for a savory recipe.  Instead of just making plain rice like you'd make at home, I highly recommend seasoning the rice before you get it into your dehydrator.  If you're making a savory dish, I recommend cooking your rice in chicken, beef, or vegetable stock and salting it slightly heavier than you would eat at home for a normal meal.  On trail, you'll wish it had more salt!  After the rice cooks, cool it to room temperature before dehydrating.  Making a sweet rice - maybe for a pudding or breakfast treat?  Try cooking it with vanilla almond milk instead of water!  When it comes time to dehydrate your rice, spread it out thinly and try to avoid clumps of rice.  Clumps will hold more moisture and take longer to dehydrate.  If you're home while it's dehydrating, go out and break up the chunks of rice every so often to help it dry out faster.  

Vegetables

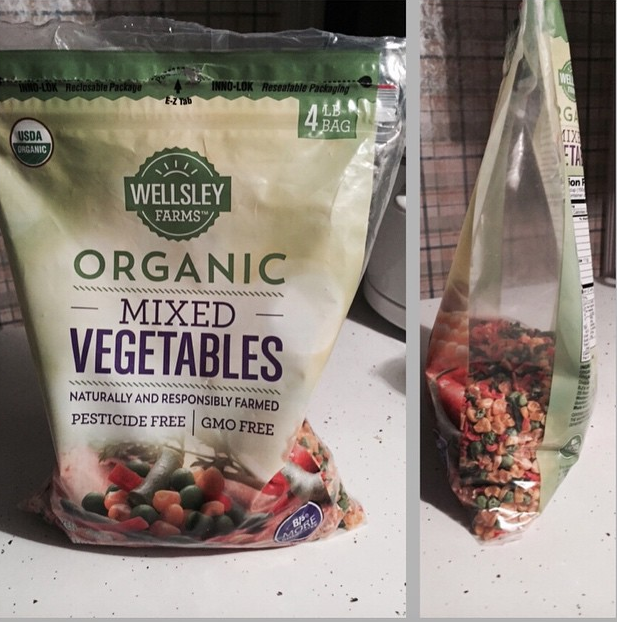
Not all frozen veggie mixes are created equally!  My favorite store, Aldi, has mixed veggies in a bag as cheap as $0.95!  However, their mixed veggies aren't all the same size and, in fact, the carrots are in rounds that are easily four times the size as the other vegetables.  This doesn't make for fast dehydrating OR rehydrating!  On the flip side of this, Wegmans makes a great mixed veggie blend with the exception of the lima beans.  Lima beans are another rehydration nightmare.  I don't care how long you soak or boil lima beans - they never seem to fully rehydrate properly.  When you're looking for mixed vegetables to dehydrate for additions to your meals, I highly recommend looking at the contents and shapes of the veggies in the bag.  BJ's Wholesale has great 4-lb bags that require minimal changes.  The only thing I did to these was cutting the green beans in half to make everything the same size.  When it comes to vegetables, uniform size is key to getting them dehydrated and rehydrated at the same times.  Trust me, there are few things sadder than being hungry on trail and crunching into half-rehydrated corn when the rest of your meal is ready!

Something I did for our meals a few years ago was broiling and blackening bell peppers before dehydrating.  This little something extra really made the flavors taste even more homemade despite being in the backcountry.  My most important tip is to NOT mix different veggies in your dehydrator at the same time if you can help it - especially strong-smelling veggies.  If you want to do a tray of red onions, put them in by themselves or else all your food will taste like onion!

I actually have EIGHT POUNDS of veggies in that second photo. They don't amount to much!

I actually have EIGHT POUNDS of veggies in that second photo. They don't amount to much!

Meat

Meat is a tricky, tricky thing to home dehydrate.  If you're doing beef or ground turkey you'll quickly become familiar with the term "gravel".  The reason?  Ground meat basically has the texture of gravel when you do it right.  Buying meat is the critical first step and you've got to do it right.  If you're set on using ground beef, you'll need to buy the leanest possible cut you can find (less than 90%, and 95% lean is more ideal).  Since buying meat this lean is often expensive, I chose to go with lean turkey as my meat choice.  We bought 99% lean white ground turkey.  Now, cooking the meat is also tricky because you'll have to do it low, slow, and as dry as possible.  No oils at all can be added to the pan, as every bit of oil can go rancid in packaging.  Adding dried breadcrumbs to your meat to soak up the oil is a great step you can take during the browning process.  After cooking the meat to well done, you'll need to sop up any oil that happened to cook out before breaking it up to place in your dehydrator.  Like rice, meat has a tendency to clump, so you'll need to break up the clusters every once in a while. Once your meat is completely dehydrated, I highly recommend vacuum sealing each portion to keep it fresh, just in case.  

Fruit

Like veggies, uniformity is key with fruit.  Having all your pieces roughly the same size will save you time on both ends of the dehydrating and rehydrating process.  One tricky element to dehydrating fruit, however, is browning.  Apples and bananas both tend to brown when they're exposed to oxygen for a period of time.  I solved this problem by brushing easily browning fruits with lemon juice on both sides before putting them on trays in my dehydrator.  I liked seasoning my fruit as well.  A sprinkle of ginger and cinnamon on apple slices comes out delicious!

Me with my bounty - an entire summer's worth of meals for two hungry hikers. 

Me with my bounty - an entire summer's worth of meals for two hungry hikers. 

Just like with any good recipe, mastering skills with a dehydrator will take time and a few errors will happen as well.  It's all part of the journey!  Have you experimented with dehydrating meals?  What is your favorite backcountry meal? 

Better Nutrition for Backpacking

Thru hikers of any distance trail are notorious for eating highly processed, fatty, best bang-for-your-buck calorie bombs for meals.  If you’re an ultrarunner you definitely know what this is like.  When you’re out burning thousands and thousands of calories per day and you’re supporting yourself by carrying all your own fueling options, you know that lightweight, high-calorie foods are king on trail.  While the best way to get better nutrition on trail in remote locations would be to make your own food, here are some hacks to help you get in some better nutrition during your next long-distance adventure. 

Chia Seeds: 

Chia seeds pack in some serious nutrition.  With fiber, protein, and omega fatty acids, adding a tablespoon or two to oatmeal in the morning will pack in more punch to get you moving.  You can also make your own chia energy drink at lunch time by mixing in some chia seed with your favorite electrolyte replacement.  

Protein Powder: 

I am a huge fan of adding chocolate protein powder to my cup of coffee in the morning on trail.  While I personally use whey protein, you can chose your favorite and add it to your coffee or tea before breakfast for a quick nutrition boost.  While chocolate in coffee is the most popular on trail option, you could also use vanilla or unflavored powder with coffee.  Vanilla powder with green tea or chai powder with coffee are also amazing flavor combinations. 

Nut Butter Packs: 

Peanut butter on trail doesn’t have to be cheap store brands loaded with sugar and palm oil anymore!  With more and more brands hitting the market, like Justin’s, Peanut Butter & Co., andBogg’s Trail Butter coming in single serve packets, it’s simple to get your fix on the go.  Bonus nutrition points to you if you consume a pack with a fresh apple you’ve packed out of town!

Coconut Oil:

Coconut oil comes in solid form and is super simple to add to any meal you’ll be making over your camp stove.  Another great bonus to using coconut oil is the fact that it can also be consumed by the spoonful.  Being high in saturated fat and easy to digest, this stuff is delicious to add to any Knorr Rice Side you’ll be eating for supper. 

Gummy Vitamins: 

When all else fails, you can always add some adult gummy vitamins to your food bag.  Chewing up two of these guys at the end of a long day after you’ve finished your supper on trail can help suppress that after-dinner sugar craving many hikers get after burning thousands of calories hiking.  

Choose Healthier Options in Town:

Heading into town every few days to resupply usually means eating a meal in an actual restaurant - one you won’t have to cook over your camp stove!  While images of greasy pizza and juicy burgers will dance in your head all the way down to town, adding a salad to your meal won’t hurt either.  If you absolutely must have that whole large pizza, consider getting extra veggies as toppings.  The same goes for your hamburger - ask for extra lettuce, tomato, and onions to go along with that delicious goodness!  Consider a healthier appetizer as well - hummus is always a great option that is on many menus. 

While many people joke about the thru hiker diet, it can actually be easy to work in some sneaky healthy foods.  Do you have any tips for working in some healthy fats and proteins on distance hikes? 

Hiker Mocha - An Easy, Popular Breakfast for Long-Distance Hikers

This shop has been compensated by CollectiveBias, Inc. on behalf of its advertiser, EAS Sports Nutrition.  #easbrand #PowerinProtein #collectivebias #ad 

Whenever I'm out on trail, be it as a guide or someone out on my own personal backpacking trip, food is the number one thing hikers will chat about while in camp at night and in the morning.  Whenever you see another hiker eating or drinking something it's common practice to chat about it and why they're consuming it.  I hadn't been on trail for more than a week before I started noticing all the hikers drinking a breakfast concoction I had never seen before.  While the drink had many names and variations (hiker mocha, ranger pudding, power breakfast...) my personal favorite was the Hiker Mocha.  Who doesn't love a fancy coffee drink at the beginning of a long morning of hiking?!  

At first my Hiker Mocha was chocolate milk powder and instant coffee, but I quickly realized that sugar energy was just burning off quick and made my teeth hurt.  I took a cue from those making the ranger pudding and switched to a chocolate protein powder.  Switching to a protein powder, however, wasn't an easy task!  Not all proteins are created equally.  Some powders contained added sugars or the dreaded sugar alcohols (REALLY harsh on the stomach after a few hours).  Some were kind of vague with wording like "proprietary blend", which I later found out means the ingredients aren't really disclosed and mixes of different ingredients are used.  While hikers eat lots of sugars and processed foods, it's nice to get a break from stuff like that at least once a day!  

When we were at the hiker mecca known as Walmart we could find EAS 100% Whey Protein powder.  I personally found Whey Protein easier to digest and it was much easier on my stomach than other brands with added sugars, which is why I chose this brand.  I was also excited to learn you can purchase this powder online as well!  This came in really handy for me when I was hiking near smaller towns where it was really difficult to find any types supplements on trail.  In fact, buying this powder online is still my favorite way to do it!

A Hiker Mocha is so great at breakfast because you can drink it hot or cold, which really comes in handy on those mornings when you don't want to have a hot coffee.  Here are the easy-to-follow instructions for making your very own Hiker Mocha!

With only three simple ingredients you have a yummy, protein-filled breakfast drink!

With only three simple ingredients you have a yummy, protein-filled breakfast drink!

Ingredients: 
-2 scoops EAS 100% Whey Protein Powder (chocolate)
-1 Tablespoon Instant Coffee or one packet of instant coffee/espresso
-1 Tablespoon Powdered Coconut Milk
-Optional honey to taste

On Trail Prep:
In your cup, measure out the first three powdered ingredients and mix together.  Add in a few tablespoons of water to make a slurry.  This will help equally distribute the ingredients and prevent any type of clumping of the milk powder.  Slowly add 8-10 ounces of water, hot or cold, to your cup. Add honey or sweetener of choice if desired. Stir well and enjoy!

The three powdered ingredients together - super simple!

The three powdered ingredients together - super simple!

Alternatively, you can also make this mix in a Nalgene or similar bottle by adding the powdered ingredients and all the water with the optional sweetener at the same time.  Shake well until ingredients are well-combined and the drink is smooth.  Enjoy while sitting in camp or on the go to get in those morning miles!

Easy to mix at home and drink on the go! 

Easy to mix at home and drink on the go! 

I found that I not only felt better with protein in my system on trail, I also was able to hike stronger in the mornings without those nasty sugar crashes that tend to come on around mid-morning.  Getting my energy from breakfast containing 30 grams of protein worked well for me!  Have you ever tried drinking a protein drink either on trail or before a long hike? Tell me what you think about adding a supplement to your diet during physical activity.  Leave me a comment below!

Check out the New NBC Show S.T.R.O.N.G where EAS® products will be featured on the June 2nd episode. (9pm EST 8pm CST). 


Recipe: Hiker Crack Cookies

It's near the end of the hiking season and you're out on a backpacking trip.  Your stomach is growling and you know it's time for second breakfast, but all the foods you've been eating since springtime just don't sound appealing anymore.  Hungrily, you'll stuff a protein bar in your face while you walk and struggle to swallow.  Sound familiar?  All hikers tend to get tired of the same flavors of bars season after season, but I'm here to help!  My recipe for Hiker Crack Cookies will help get you through the rest of your season and are actually pretty good for you too!

These cookies are delicious all on their own, but on the trail I do step it up one more notch and add a filling.  When peanut butter or any other butter of your choosing (cookie butter, anyone?!) is added they make amazing sandwich cookies!  When I'm at home I dip them into yogurt or slather them with coconut butter as icing - even fruit spread is great on them.  Eat just one cookie and you'll see why we started calling them Hiker Crack!

A plate of deliciousness! 

A plate of deliciousness! 

Hiker Crack Cookies (makes 4-5 dozen)  //   350 degrees for 10-12 minutes

Ingredients:
3 room temperature eggs
1 stick (1/2 cup) room temperature butter
3/4 cup white sugar
3/4 cup lightly packed brown sugar
1 cup nut butter (I've used all combinations of almond, cashew, peanut butter, and even Nutzo!
                             You just need it to equal one cup total)
1 teaspoon vanilla
2 teaspoons baking soda
1/2 teaspoon kosher salt
1/4 cup hemp seed (you can also use pumpkin, sunflower, or sesame seeds!)
1/4 cup chia seed
1/2 cup chocolate chips (I prefer the minis - you can get more in there!)
1/2 cup of currants/cranberries/raisins/blueberries - your choice!  Mixing is fun here too!
1/2 cup unsweetened coconut
1/2 cup of almond flour or oat flour* 
3 cups rolled oats

Instructions:
1) Cream together the butter and both sugars until smooth and pale in color.  Slowly add in the eggs one at a time until mixed.  Add in your nut butter mixture until smooth, followed by your vanilla.  Scrape down the bowl.  Finally, add in the salt and baking soda and mix until smooth. 
2) While the mixer is going, put your hemp seed, chia seed, chocolate chips, dried fruit, coconut, almond/oat flour, and rolled oats in a mixing bowl and stir with a fork to evenly combine ingredients. 
3) Slowly add the dry into the wet ingredients until just combined.  
4) Refrigerate the dough for at least an hour - this is crucial or else your cookies will spread out and be very runny in the oven!
5) Preheat the oven to 350.  Using a tablespoon, drop the cookies onto the sheets and space them at least an inch apart.  
6) Bake for 10-12 minutes.  When they are just starting to turn golden brown on top, pull them out of the oven.  In my oven the bottom rack heats faster and I make sure to rotate my trays halfway through cooking.  Your oven may vary, so watch them closely on the first batch!
7) Let the cookies cool slightly before moving them to cooling racks. 

*Oat flour is simple to make at home if you don't have almond flour!  All you need to do is take 1 cup of rolled oats and throw them into a blender or a Magic Bullet.  I find that 1 cup of oats is pretty close to 1 cup of oat flour and makes a great substitute in recipes. 

Do you have any go-to recipes for day hiking or a backpacking trip that don't involve your typical trail foods?  I'd love to hear about them.  Leave me a comment below or join the conversation over on Facebook!

Two weeks of food done... only six more to go!

This afternoon, in between making my own bacon bits (yes, really!) and dehydrating more frozen vegetables, I was able to bag up 32 trail breakfasts.  This means NoKey and I have 16 days of breakfast all ready to pack up and mail!  

Breakfast Rice and Breakfast Couscous Ready to Go!

Breakfast Rice and Breakfast Couscous Ready to Go!

So, while it may  not look like much, these 32 meals were a big undertaking.  I did the rice dehydrating myself so we could use a brown rice instead of a minute rice.  When you dehydrate things yourself you not only control the quality of the ingredients, but you get a little more flexibility on what goes into the rice.  For this batch of breakfast rice, I actually cooked it in sweetened vanilla-flavored almond milk!  It gives the rice a nice subtle sweetness and the sugar energy hikers need at breakfast time.  I've posted recipes for the breakfast rice and couscous below!

Breakfast Rice Pudding (adapted from Backpacking Chef Glenn) - One Serving
-3/4 cup rice of your choice, cooked in vanilla almond milk and dehydrated
-1/2 tsp sugar
-1/4 tsp cinnamon
-1/4 cup dried fruit of your choice (I mixed it up and did some tropical mix, apples and cranberries, blueberries and coconut, and currant with coconut)
-1 tablespoon slivered almonds
+At home prep - combine the first 3 ingredients into a labeled freezer bag
+Put the dried fruit and almonds into a snack-sized zipper bag; put this smaller bag into the bag with the other ingredients and seal, making sure to remove as much air as possible
+Trail prep - Remove the bag with the fruit and nuts and set aside.  Pour the rice mix into your cook pot and let it reconstitute for 5 minutes.  Turn the heat element on your stove up and bring to a near-boil. Just before boil, shut off the heat and cover.  Let it sit approximately 10 minutes.  Devour!

Breakfast Couscous - One Serving  
-1/2 cup whole wheat couscous
-2.5 TBSP milk powder (use whatever kind you like - I mixed whole, skim, and coconut powders for this recipe)
-1 TBSP brown sugar
-1/4 tsp HEAPING cinnamon
-2 TBSP slivered almonds
-2 TBSP dried fruit
+At home prep - Combine all ingredients above into a labeled plastic zipper bag and seal, getting out all air completely. 
+Trail prep - Bring approximately 3/4 cup of water to a boil and turn off the heat.  Carefully, add the water to your bag and seal.  Squish the bag around to make sure all ingredients get water.  Let it sit approximately 5 minutes.  Fluff couscous and eat.