I recently, as a member of the Green Mountain Club, read an article in their quarterly publication about a man who decided to thru hike the Long Trail using the gear early hikers would have used back in the 1910s (when the trail system was officially open for use). This interesting read got me thinking to how much gear has changed in the past 100 years. I thought it would be fun to do a little research and share my findings with all of you guys. I hope you find it as fun to read as I had writing it! Since the article I read was replicating a thru hike of a trail in 1917, that's as far back as I decided to go. Since the National Park System in the US was developed and created only a few years prior to this, I decided that many people were more than likely not camping recreationally before this period. Granted, people were following their herds to the high country for the summer and camping out long before this, I find that those "headed to camp" accounts don't really make for good backpacking gear stories.
The Early Years

Catherine Robbins, Hilda M. Kurth and Kathleen Norris, 1927
photo (and great story) from Seven Days.
One of the first things that stuck out to me in the article I read in Long Trail News about the gear was this paragraph:
"For food, bread and bacon will keep you going with little weight." "No person should ever travel The Long Trail without axe, compass, and matches" "A tent is not necessary on most of the trail; it may be needed in the southerly part if the hiker desires to sleep out, in which case a very light, small tent of balloon silk is advised"
Already the gear differences and advice are pretty fun to read about. I also loved reading that Mike MADE HIS OWN PACK out of brown ash wood. Yep, that's right. A "pack basket" was all the rage back in those days. For an example of gear you would have carried in those days in your pack basket see below (it's also worth noting that back in those days it wasn't uncommon for hikers to cut boughs off trees to make a bed for the night; since that is no longer done for obvious LNT ((Leave No Trace)) reasons, it's worth noting that the hiker here stuffed a pillowcase with leaves):
-Wool blanket
-Homemade waterproofed cotton tarp and cotton groundsheet
-Camp knife (hand forged) in a leather belt sheath
-2 Quart metal canteen
-Bug Net
-Alcohol stove with alcohol carried in a GLASS bottle
-Tin cup
-Matches
-Waxed cotton food bag
-Candle for nighttime
-Wool knickers
-Wool knee-length socks
-Leather hat
-Leather boots
-Rubberized poncho
FOOD:
-Hardboiled eggs, rice, cashews/almonds/raisins, bread, cheese, cured meat, canned fish, and hershey's chocolate
I also love that for this hike Mike used birch and beech twigs to brush his teeth!

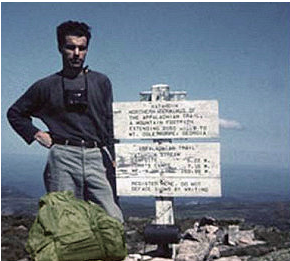
Mike Debonis on his 2017 thru hike of the Long Trail, using 1917-style gear.
1940's-1950's
I couldn't find much for the period in between our history hiker and the WW2 era, so I'm going to skip ahead to Earl Shaffer - the first ever thru hiker on the Appalachian Trail. It can be said that Shaffer was the first ever Warrior Hiker - he took to the trail to "Walk off the War" in 1948. Earning himself the name "The Crazy One", he was the first person to ever hike the trail all the way through in one year. At first, even the Appalachian Trail Conference (later, Conservancy) didn't believe him! He may also be considered the first minimalistic hiker, being that his tent failed in the first week on the trail and he got rid of it, saving himself an additional five pounds! Back when Shaffer thru hiked in 1948, he was taken in by friendly fire tower wardens and fed meals; he even hiked hunting camp to hunting camp in Maine. On his thru hike in 1998, Shaffer relayed via letter to Gene Espy (the second thru hiker of the AT) by letter that the trail had become much more difficult than when they hiked it decades before, the trail conservancy having routed the trail up to the higher and harder ridge lines instead of being down low near the hunting camps. An example of his gear can be found below:
-Mountain Troop rucksack
-Military issue poncho (which also served as his rain shelter at night!)
-A Daisy Mae Rainhat
-Match safe
-Compass
-Sheath knife and small handaxe
-Sewing kit
-Snakebite kit
-Mountain Troop cook kit
-Wool blanket
-Wool pants
-Russel Birdshooter Boots
Earl Shaffer atop Katahdin in 1948 with his pack (photo from earlshaffer.com)
Gene Espy, our second-known thru hiker went through northbound in 1951. He had some great gear as well, including one of my favorite luxury items - an inflatable pillow! His gear weighed in at a whopping 50 lbs and included the following (from gearjunkie):
-Steel frame pack
-Lamb’s wool used as comfort under the heavy pack straps
-Tent (without a floor) and tent posts
-Down sleeping bag
-Watch; to know his time between shelters
-Guide books
-Hatchet and rope
-Inflatable pillow
-Camera
-New Testament Bible
-Diary and pencil
-Collapsible cup
-25 caliber pistol (which he claimed he used as protection from bears)
-Carbide lamp (this is what miners used back then as a headlamp - it requires chemical reaction to make it work!)
-Nylon poncho used for a rain jacket and as flooring in the tent
-Pants from the Navy to protect his legs from thorns
-Two long sleeve shirts
-2 pairs of hiking socks
-Hat
-Tin water cup
-Snakebite kit
-Boots
FOOD:
Gene carried about a week of food at a time, and his favorite foods included chocolate pudding, loaves of bread, and Baby Ruth candy bars.

Gene Espy during his thru hike in 1951 (from geneespyhiker.com)
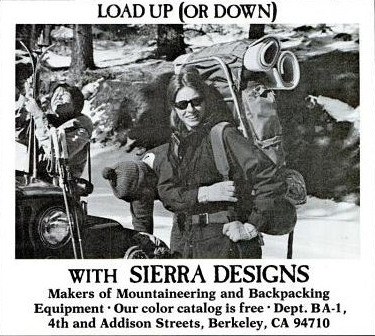
1960's and 1970's
With the 1960s and 70s came the "heyday" of the American National Park System. More and more folks were able to get out and enjoy not only the national parks of our country, but also the backcountry and hiking trails provided by our parks! Check out some of these vintage ads I found while scouring the internet. Heck, I know some sleeping bags that weigh more than 3.5 lb have even tried to make their way out onto a backpacking trip I was leading!
During the late 1950s the AT saw it's first female thruhiker, Grandma Gatewood. She would go on to hike the trail two more times during her life, making her the first multi completer of the trail. While I couldn't find a comprehensive gear list, I did find a photo of her gear (circa 1960) (thanks, Reddit!) at the Appalachian Trail Museum. It's safe to say she was the first ever "dirtbag hiker", hiking with a homemade denim sack, a rain cape made from a shower curtain, and was the first hiker to ditch the heavy boots for lightweight shoes, recommending Keds to all hikers she met! She was also the first thru hiker to "slackpack" her way along the AT. She often wandered off the main trail to knock on doors to ask for a place to stay or to get a hot meal.
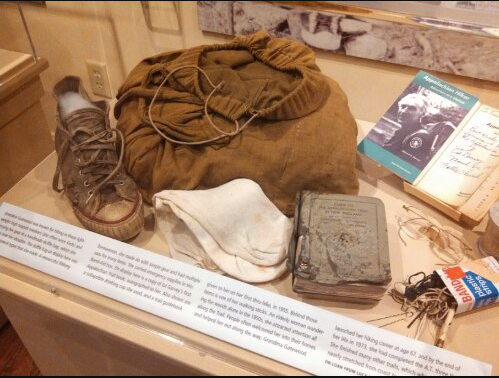
Photo Courtesey of the AT Museum and google images.
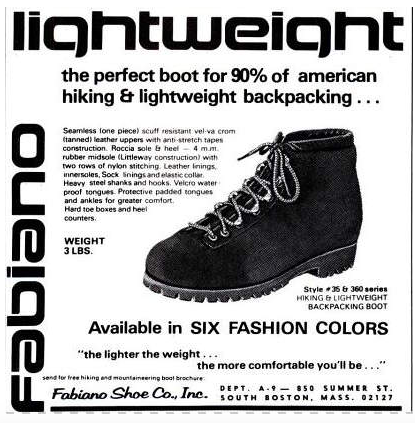
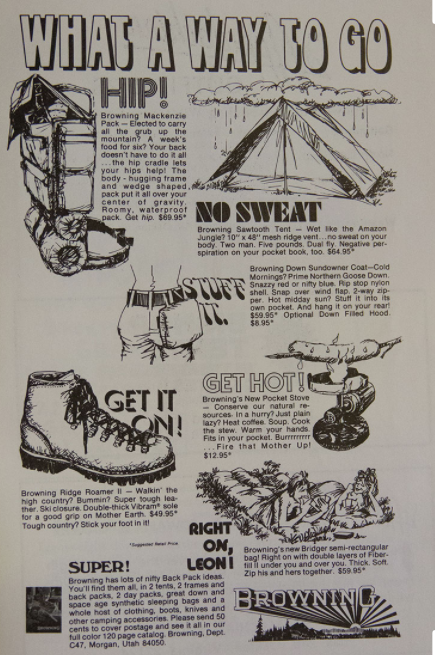
The 1970s is when backpacking really started changing. Jansport and Kelty led the way in creating lightweight external frame packs with specially designed pockets for hauling gear ergonomically. Also during this era we see the very first Therma-A-Rest mattress hit the market. Now, instead of cutting live tree boughs, hikers can sleep on an ACTUAL mattress in the woods! Check out the weight of those "lightweight boots" by the way - only THREE POUNDS!
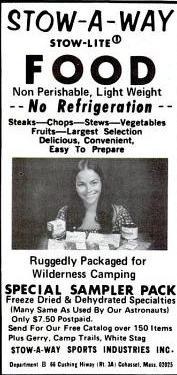
You also start seeing the commercial freeze dried and dehydrated food industry taking off. Yes, America - you too can eat like our astronauts!


Click on the photo bar to scroll through! (Photos here are sourced from google images)
1980's and 1990's
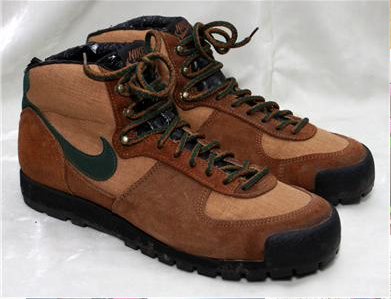
Lightweight was the name of the game! Ultralight was truly being developed during this time period, despite how many of us would think it was something more recent. In fact, 2-lb packs were being developed during the late 1970s and early 1980s! Nike was even on the forefront of developing a lightweight hiking shoe/boot hybrid - the Lava Dome! While many folks were still carrying external frame packs during this period, the frame during this time started moving to the INSIDE of a pack - something unheard of before now! During this time period we also meet some of THE names in backpacking that many hikers still know today, the most famous of whom is Ray Jardine. Ray and his wife, Jenny, began thru hiking in the late 1980s and can still be found out on the trail today. In 1991, Ray wrote a book about his PCT thru hike, talking about how it was possible to hike much faster and lighter by making homemade gear. In fact, he still regularly publishes and hikes today.
During the 1990s we see many what we would call "Cottage Industry" companies starting to pop up as well. Dana Designs and Gossamer Gear both got their start in the 1990s when regular hikers started getting fed up with not being able to find what they wanted in gear that was commercially available.
During this time we also see people hiking in light athletic shoes versus heavy boots. Laurie "Mountain Laurel" Pottieger (of ATC fame) switched to running shoes during her 1987 thru hike of the AT. While she switched back to boots for rockier sections of the trail, at the time it was practically unheard of (and was done by the Jardines as well!)
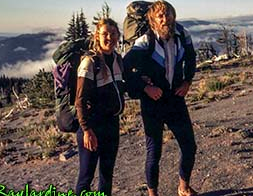
(photo of the boots from google images and Jenny and Ray from RayJardine.com)
The 2000's and 2010's
These days, fast and light is the name of the game. With more and more FKT (fastest known time) attempts on the trail and more hikers getting savvy to the "less is more" way of backpacking, it's possible to hike more than 2000 miles carrying little more than a daypack. Some of the more famous names in the game right now include Anish, String Bean, and Lint. For an example of what these ultralighters are carrying, check out Lint's thru hiking gear list.
While not everyone is going ultralight, it's pretty unusual to see anyone out on the trail these days carrying more than 35 lb. We know now that the average pack should be 25% or less of your total body weight. With lighter packs comes the ability to wear lighter shoes as well. In fact, reading surveys of commonly used gear online you'll see that less than 20% of hikers are now wearing boots on trail, opting for lightweight trail running shoes instead.

An example of what a thru hiker would carry on the AT courtesy of @GossamerGear on Instagram (@ryanshamy original)
And there you have it - a pretty comprehensive history of how gear has changed since the early days! Gone are the days when heavy boots and 50-lb packs are the norm. Here to stay are the lighter, easier to carry packs with quick drying shoes and gear to get you from point A to point B in relative comfort!
Would you have been able to thru hike Grandma Gatewood style? When did you first start collecting your backpacking gear? What piece of gear do you remember and miss the most?